Epsilon Delta Applet
Contents
About the Epsilon-Delta Applet for WeBWorK
This applet and WeBWorK problem are based upon work supported by the National Science Foundation under Grant Number DUE-0941388.
Click here and here to see two different problems making use of this applet (you may login as a guest).
Where to find more problems like this
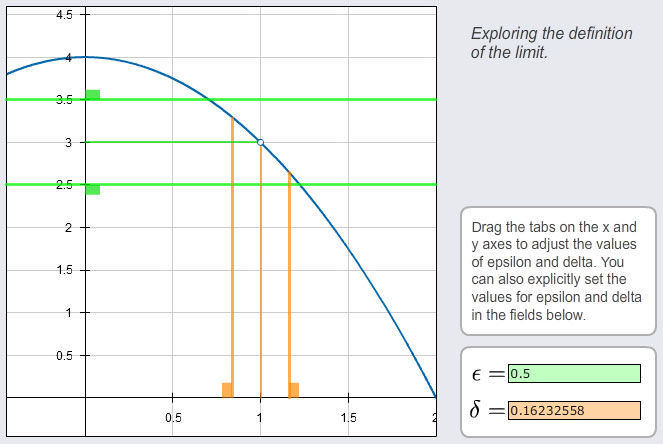
The Epsilon-Delta Flash applet was designed to allow students to investigate the formal definition of the limit within a WeBWorK problem. The applet is mainly used to investigate the relationship between values for epsilon and delta. A WeBWorK problem must be written to accompany this applet, and ask appropriate questions about the function being displayed.
The same applet can be used to author both a problem where students investigate an existing limit, or perhaps a situation where the limit does not exists. The problem can be customized by changing the graph of the function to the left and right of the limiting point, as well as setting whether the function is defined at the limiting point.
An example problem where the limit exists:
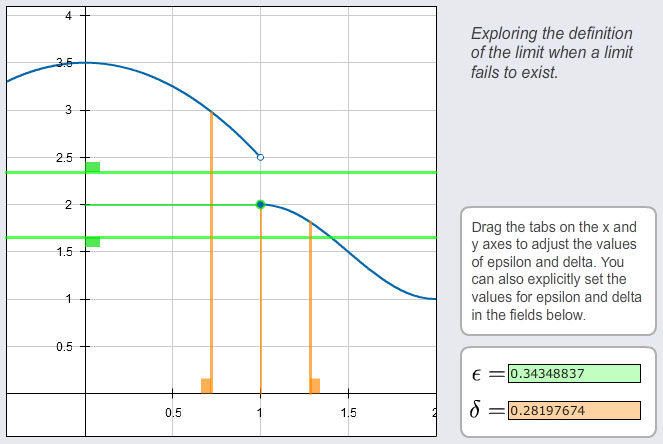
An example problem where the limit does not exist:
Including the Flash applet in the WeBWorK problem is done in a way similar to other problems documented on this Wiki. For example see SolidsWW_Flash_Applet_Sample_Problem_1
Customizing the WeBWorK problem
For the sake of completeness, we include at the bottom of this page the full working PG code for a problem implementing this applet, but here we will only comment on the problem setup section of the code. This section contains all of the parameters that can be altered to adjust the appearance of the applet, to suit your needs as you author new WeBWorK problems using this applet. In addition to chaning the appearance of the applet, the author must write an appropriate problem in WeBWorK PG code to accompany the applet.
After the tagging, description, and initialization sections of the problem, the parameters for the applet are set up in a section following the comment line:
########### Problem parameters for customization here #######################
Below are the values that are used in an example problem where the limit fails to exist. The applet will draw a function with a jump discontinuity, by defining two separate functions to the left and right of the limiting point. Whether the applet is used to draw a continuous function or one with a jump discontinuity, the parameters are set in the same way.
The plot window
We set boundaries for the window in the following variables
$xMin = '-0.45';
$xMax = '2';
$yMin = '-0.45';
$yMax = '4.1';
The functions to plot
The functions plotted on left and right sides of the x value being approached. (To create a continuous function, we would set these functions to the same expression.)
$leftFunction = '3.5-x*x';
$rightFunction = '1.5+0.5*cos(pi*(x-1))';
We can choose to define the function at the x value being approached, or leave the function undefined, by setting the following variable to true or false:
$approachXInDomain = 'true';
We can set the value of the function at the x value being approached, independent of the left and right functions defined above(this will have no effect if approachXInDomain is set to false):
$functionValueAtApproachX = 2;
The x-value being approached in the supposed limit:
$approachX = 1;
The proposed value of the limit (which, in this example, is in fact being shown not to be correct):
$proposedLimit = 2;
Initializing epsilon and delta
Sliders allow the student to adjust the size of the epsilon and delta bands. We set the initial values for epsilon and delta for when the applet first opens as follows:
$epsilon = 0.75;
$delta = 0.5;
Epsilon and delta decimal accuracy for the text display:
$decimalPlaces = 8;
Labels and tick marks
spacing for both the numerical labels and tick marks along the axes:
$labelSpaceX = '0.5';
$labelSpaceY = '0.5';
Spacing of grid lines
$gridSpaceX = '0.5';
$gridSpaceY = '0.5';