Planet: The Webwork Project blog posts

Contents

  1. The WeBWorK Project and Rederly – A New Collaboration The Webwork Project: • 21 hours ago
  2. Building a thriving WeBWorK community at CUNY The Webwork Project: • 22 hours ago
  3. WeBWorK Leaderboards from Experiment to Feature The Webwork Project: • a day ago
  4. Release of WW 2.15 approaching – additional pre-release testing would be helpful The Webwork Project: • a day ago
  5. Embedding single WeBWorK problems in HTML pages Michael Gage: • over a year ago
  6. Installing the WeBWorK opaque server and the Moodle opaque client Michael Gage: • over a year ago
  7. CodeMirror and PG Goeff Goehle: • over a year ago
  8. LiveGraphics and Javascript Goeff Goehle: • over a year ago
  9. WeBWorK LTI - Authentication Goeff Goehle: • over a year ago
  10. Release 2.12 Goeff Goehle: • over a year ago
  11. Python in WeBWorK Goeff Goehle: • over a year ago
  12. OPL Statistics Goeff Goehle: • over a year ago
  13. WeBWorK LTI - Grading Goeff Goehle: • over a year ago
  14. Hardcopy Themes Goeff Goehle: • over a year ago
  15. Grades, External Grades, and Email Goeff Goehle: • over a year ago
  16. Release 2.11 Goeff Goehle: • over a year ago
  17. Using WeBWorK questions in Moodle quizzes -- the Moodle/WeBWorK question bridge Michael Gage: • over a year ago

Friday, 17. July 2020

The Webwork Project:

The WeBWorK Project and Rederly – A New Collaboration

We are pleased to announce a new engineering collaboration between The WeBWorK Project (TWP) and Rederly. This collaboration represents an exciting new chapter by uniting TWP’s experience with Rederly’s engineering expertise.

The preliminary goal of the collaboration is to create an independent rendering environment, with the ability to add on additional modular features, such as development and authoring, collection of metadata, and easy integration with external platforms.

This modular development will expand WeBWorK’s reach by creating a standardized environment to embed and modify WeBWorK content without a full-scale installation, thereby opening opportunities to collaborate and further engage with the broader OER community.

“We are excited to collaborate with and contribute to the WeBWorK community,” said Jake Medina, Rederly CEO. “We hope this will be the first collaboration of many and look forward to working closely with TWP and the OER community to standardize and enhance this key pillar of WeBWorK.”

“An improved rendering environment is fundamental to future enhancements to WeBWorK,” said Robin Cruz, President of TWP.  “TWP looks forward to working with Rederly on this project and we are pleased that Rederly will contribute this work back to the OER community.”

With one collaboration in development, TWP looks forward to an ongoing relationship with Rederly resulting in improved functionality and infrastructure for the WeBWorK platform.

About WeBWorK

WeBWorK is an open-source online homework system for math and science courses. WeBWorK is supported by the MAA and the NSF and comes with a National Problem Library (NPL) of over 20,000 homework problems.

About Rederly

Rederly is an open source education technology provider that collaborates closely with the OER community to build custom technology solutions. Rederly offers cloud-hosted, WeBWorK-compatible homework and exam services, including advanced features and broad faculty and student support.


Building a thriving WeBWorK community at CUNY

by Michael Gage – Friday, 7 February 2020, 3:03 PM Marianna Bonanome (MBonanome@citytech.cuny.edu) and K. Andrew Parker (KParker@citytech.cuny.edu) at CityTech (NYC college of technology) in New York City have been busy organizing a community of WeBWorK users in the NYC area among the CUNY campuses.

In 2012, driven by the desire to provide zero cost alternatives to expensive texts and proprietary homework platforms, City Tech math department faculty began authoring open source textbooks [1] and using WeBWorK to provide online homework for its students. At the time, WeBWorK problems were created by primarily relying on content shared by other WeBWorK-using institutions via the Open Problem Library (OPL). While less than ideal in some ways, this level of WeBWorK adoption represents a minimum amount of required investment – and it is essentially how all WeBWorK-using institutions get their start. Several CUNY campuses are still at this stage – where they have curated their curricula from the contributions of other institutions.

It is common for institutions to see limited adoption of WeBWorK during this phase, and
City Tech was no different. Instructors participated in WeBWorK training on a strictly
voluntary basis, with no compensation provided for trainers or trainees. Students
struggled with inconsistencies between problems – stemming from the fact that the
problems themselves came from different institutions or that the problems used
terminology aligned to a different book than the one used by their instructor. In short,
the curriculum needed revisions in order to be consistent at the problem level, and
alignment with the textbook at the course level. without external support, this revision
process moved forward at a very slow pace.

In 2015, City Tech was jointly awarded a 5 year, $3.2 million, Title V Department of Education grant with BMCC: Opening Gateways to Completion [2]. This funding was transformational in providing essential resources to faculty who were developing WeBWorK content and disseminating best practices for the use of WeBWorK in the classroom. The pace at which each campus was able to develop and align their curricula began to accelerate.

As early as Fall 2016, content for a full course of College Algebra & Trigonometry had been completed and faculty training began. Several professors were identified as “experienced” WeBWorK users, and they served as early-adopters for the new curriculum. During the limited release, lingering inconsistencies in the problems were identified and resolved, feedback from the early-adopters was incorporated, and the curriculum emerged as a polished product. In the subsequent semesters, over 100 instructors have chosen to use WeBWorK in this course at City Tech.

With the grant funding, City Tech has so far completed customized curricula for three STEM-pipeline courses. These problems have been shared back to the WeBWorK community, where City Tech currently ranks as the 7th most prolific contributor to the OPL. A similar sequence of courses has simultaneously been completed at BMCC, and their eventual contribution to the OPL will raise CUNY’s OPL ranking even higher. This collection of locally-developed content has benefited an ever-growing body of students. As of Spring 2019, 8,600 students had used grant-funded WeBWorK content across both institutions, representing a value of approximately $215,000 [3]. At City Tech, use of these materials has grown to over 100 sections and 88 participating faculty members for the fall 2019 semester. City Tech expects their impact to stabilize around roughly 9,000 students per academic year, with the majority of those enrolled in truly zero cost courses that pair WeBWorK with OER textbooks.

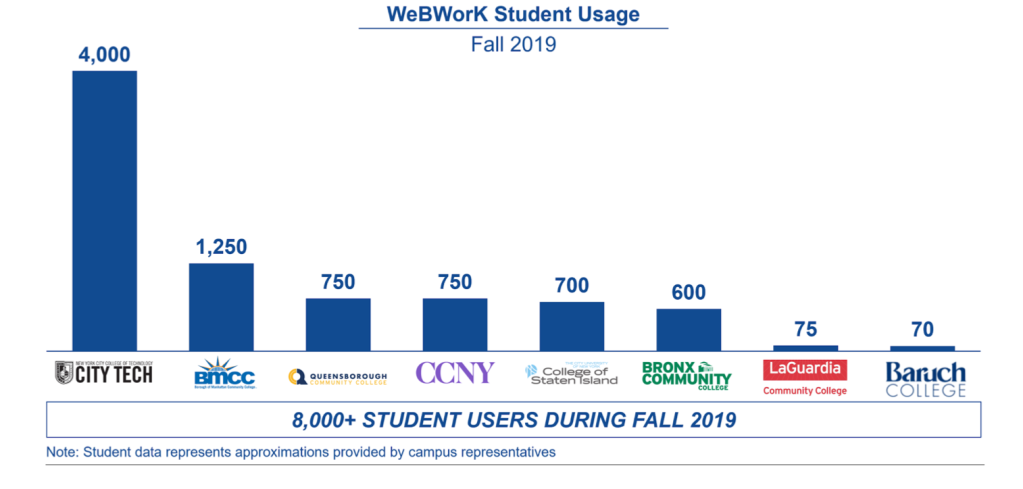
In Fall 2019, with the end of the Opening Gateways Title V grant looming, City Tech took the initiative to reach out to other WeBWorK-using CUNY campuses. Information was gathered on WeBWorK administration, faculty professional development, student/faculty usage, administrative support, growth and future plans. This information was shared with campus participants and discussed at meetings with representatives from City Tech, BMCC, BCC, City College, LaGuardia CC, Queensborough CC, Baruch and CSI. It was determined that, rather than moving forward separately, a cross-campus collaborative effort for WeBWorK content creation/alignment should be established along with centralized training and professional development.

In order to focus these efforts, more detailed information was gathered regarding OER textbooks/WeBWorK problem set pairings. Partners willing to align WeBWorK content to specific OER texts in current use by multiple CUNY campuses were identified. A proposal requesting CUNY OER (Open Educational Resource) funding was submitted in December of 2019 in support of this project. Since the proposal was submitted off-cycle, the request was only able to be partially granted. Re-submission in the next academic year was encouraged. These funds are supporting partners from City College, LaGuardia CC and Queensborough CC in the authoring, alignment and sharing of WeBWorK content for Calculus I (spring 2020). This content will be aligned with the free online textbook OpenStax Calculus 4 and shared back to the community via WeBWorK’s Open Problem Library (OPL).

Moving forward, it is the hope that more campuses will be onboarded as partners, widening the adoption of existing content and accelerating the creation of new content. Our ultimate goal is to build a robust WeBWorK community at CUNY with faculty working collaboratively in support of student learning while reducing financial barriers. The potential impact of a fruitful collaboration between campuses is huge as there are currently 250,000 students in the CUNY system, many of which are enrolled in degree programs with math requirements.

If you would like to learn more about our work, please contact us.

Respectfully,

Marianna Bonanome (mbonanome@citytech.cuny.edu) and Andrew Parker (kparker@citytech.cuny.edu) City Tech, CUNY

[1] Arithmetic | Algebra by ElHitti, Bonanome, Carley, Tradler and Zhou and Arithmetic | Algebra Homework by ElHitti, Masuda and Zhou; Precalculus by Carley and Tradler.

[2] https://openlab.citytech.cuny.edu/openinggateways/

[3] Using a cost of $25 per student – representing a direct comparison with Lumen

[4] https://openstax.org/details/books/calculus-volume-1


WeBWorK Leaderboards from Experiment to Feature


Release of WW 2.15 approaching – additional pre-release testing would be helpful

by Nathan Wallach – Thursday, 8 August 2019, 4:05 AM.

The release team is working on finalizing the release of WW 2.15.

The preliminary code is in the WeBWorK 2.15 branch (there is also a 2.15 branch of PG). See: https://github.com/openwebwork/webwork2/pull/948
There are still some “small” changes planned, but the core features are all essentially frozen, except for some remaining PRs under review to polish things off.
The big changes are:

  1. UTF-8 / internationalization support (several production sites have been using the current code or earlier versions already),
  2. Support for use of MathQuill as an alternative to MathView and WirisEditor as a math input and preview tool.

People are invited to test out WW 2.15 using Docker or a non-production server and to contribute to the pre-release testing in the coming few weeks.

  • Testers should pay attention to the setting of $ENABLE_UTF8MB4 in site.conf (see site.conf.dist).
  • We recommend it be set to 1 (on) unless you are testing outside Docker on a system with an old mysql which does not support utf8mb4.
  • Testing on a system with existing course database tables will require upgrading the tables (admin tables with the bin/upgrade_admin_db.pl script and courses using the admin interface).

Users of foreign languages are encouraged to help create a hard-copy theme for their language with the appropriate LaTeX headers for their language using either pdflatex + babel and/or xelatex + polyglossia. (Including a note about fonts needed and how to install them, both in the hard-copy theme file and in the pull request would be helpful.)
Moving a production site to WW 2.15 will require database table updates, and more “small” DB changes are under consideration to head off that requirement for WW 2.16, if possible. So, upgrading production sites before the formal release may require upgrading your tables again. Patience is recommended for production servers, especially on a server with many courses.

Friday, 30. November 2018

Michael Gage:

Embedding single WeBWorK problems in HTML pages


Whether writing a full text book or just an explanation and worksheet for a class it is often useful to include an active (even better an interactive example) within the text itself. You can always use a link to refer to a WeBWorK homework set but that doesn’t have the immediacy of a problem embedded in the page itself.  

Now you can use WeBWorK to do that -- there is a new mechanism that allows you to export the content of an individual problem without all of the buttons and navigation items that usually appear for a standard homework set. Here is an example.

Problem 1 -- interval notation


In many websites this problem is interactive, try it.   After the jump I have attached a link to an HTML page with many more examples which you can try out. You can also download the page and modify it to display other questions.  On the HTML page I have wrapped each example with a "knowl" slide down javaScript that allows you to slide open or to close each example question individually.


Read more »

Tuesday, 13. June 2017

Michael Gage:

Installing the WeBWorK opaque server and the Moodle opaque client


Installing the WeBWorK opaque server and the Moodle opaque client

Introduction

The Opaque question type and the Moodle Opaque client were created by Tim Hunt to allow webservices to power questions used in the Moodle quizzes. They were specifically designed to work with the OpenMark question engine at the Open University in England with the expectation that they could interoperate with other question engines as well. 
The WeBWorK Opaque server described in this document accepts requests from the Moodle Opaque client and returns a rendered PG question. 
The combination of the Moodle Opaque client and the WeBWorK Opaque server allows any WeBWorK question to be included in a Moodle quiz giving Moodle quizzes access to the entire range of mathematics questions commonly used in WeBWorK homework installations, in particular all of the questions in the OpenProblemLibrary. The WeBWorK/Opaque question type behaves much like STACK questions (created by Chris Sangwin) and supplements the mathematics questions available from STACK (System for Teaching and Assessment using a Computer Algebra Kernel).
This is a first attempt to interface WeBWorK (or to my knowledge any question engine besides OpenMark) with the Opaque client. Suggestions for improvements particularly from experienced Moodle users familiar with question “behaviours” and how to configure them to best advantage are welcome.
The main steps are as follows:
  1. Install the opaque question type client in Moodle
  2. Configure the Moodle question engine (and test)
  3. Create a Moodle quiz with opaque questions (and test)

The steps above do not require you to set up your own opaque server. You can use the publically available opaque servers listed to test that the Opaque client and Moodle quiz have been set up correctly. 
If you already have a WeBWorK installation then adding the WeBWorK Opaque server is straight forward. “Install the WeBWorK Opaque Server”. 
To see the tools available for duplicating an existing WeBWorK course asa course using Moodle quizzes read the section “How to transfer a WeBWorK course with homework sets to a Moodle course with quizzes”.

Read more »

Monday, 08. August 2016

Goeff Goehle:

CodeMirror and PG

Do you edit PG problems using the WeBWorK interface? Do you have trouble finding missing semi-colons because the error line numbers are wrong? Do you grind your teeth every time you try to tab in the editor and you lose focus on the text box? Then this post is for you!

The classic editing environment in all of the WeBWorK PG editors is nothing more than a HTML <textarea>. This leaves a lot to be desired. It doesn't have line numbers, it doesn't have any code coloring, and if you tab you leave the textarea. In an upcoming update we will replace the textarea editor with a CodeMirror based one. CodeMirror is a Javascript based editor that supports coloring, line numbers, regex based search and replace, and many other features. Rather than just posting a screen shot, I've included a functional version of the editor below.

Lets go through some of the new features. Feel free to experiment and explore with the demo above as you follow along.

Coloring

First, notice that the editor supports code coloring. Most of the code coloring is perl based, however there are a couple of twists. You may notice that both the BEGIN_TEXT/END_TEXT block and the BEGIN_PGML_SOLUTION/END_PGML_SOLUTIION blocks are colored. There have been PG specific upgrades to the coloring code which highlight variables, latex, ascii math, as well as command subsitution in both the classical EV3 blocks as well as newer PGML blocks. The PGML coloring in particular is fancy since it correctly colors nested blocks.

Line Numbers

One nice addition is line numbers. However, another behind the scenes upgrade is a fix to a long standing bug which caused the line number errors in PG error messages to not match the line numbers in the original code. So now if you miss a semicolin somewhere in your code, the perl error line number should be closer to the actual error.

Search and Replace

Changing over to a Javascript editor means that the browser based find function no longer interacts with the editor. Luckily the Codemirror editor has its own search and replace functionality which is even more powerful than the browser search. For example, use Ctl-F and search for Text. You should see the words heighlighted as well as indications on the scroll bar. Next do a search replace with Shift-Ctl-F and search using the Regular Expression /\[`([^`]+)`\]/ and replace with [``$1``]. This will replace all regular PGML Latex with display style PGML Latex. These sorts of Regular Expression manipulations can be really powerful once you get used to them. You can read more here if you haven't seen them before.

Trailing Spaces

In PGML spaces matter. You leave two trailing spaces on a line to create a newline and you leave three to have a new paragraph. Since you can't usually "see" trailing spaces when in a PGML block the editor will highlight trailing whitespace with a red line.

Tabbing and Brackets

A couple of other common code editor features that are included are bracket matching and tabbing. When you type or move past brackets the matching bracket will be highlighted. When you press tab a soft tab consisting of four spaces will be generated. Finally when you are on a tabbed line and create a new line it will automatically start with the same indentation as the previous one.

There are other features that could be added, if there ends up being enough interest. The most interesting, but also the most complicated, would be a autocompletion. The main issue with this feature is it would have to be aware of what macros were loaded, and if the macros ever changed then the code completion might be wrong. Another potential edition would be true smart tabbing which would try to parse the code and only insert tabs when appropriate.


LiveGraphics and Javascript

Its been a while since I've posted, but that does not mean nothing is happening.  The just-in-type homework system is now in the pipeline to be merged into develop and should be available in the regular release in Fall 2015.  I've also been spending time rebuilding WeBWorK's default 3d grapher using javascript, webgl, and canvas.  This will eliminate the need for the current java applet and is much more portable.  Read more about it after the jump.

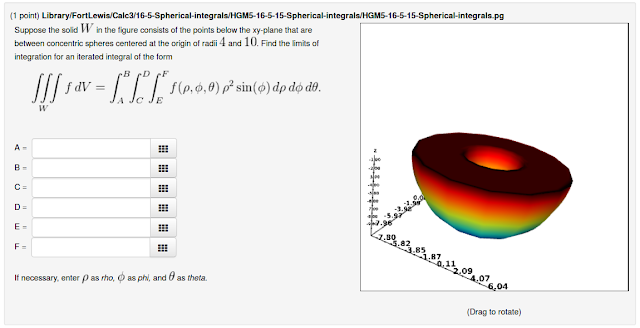
The best WeBWorK problems are those which have a feature or capability that would be impossible using traditional pen and paper homework.  Some of my favorites are the multivariable calculus WeBWorK problems which include an interactive 3d graph.   Students generally have a hard time visualizing 3d objects and including a manipulable 3d view of a surface is something that would be impossible without web based homework.  WeBWorK has a number of this type of problem and they were all written using a java applet called LiveJar.  This applet takes raw Mathematica code describing a graphical object, either generated by the problem pg code or included via a file, and renders a graph similar to what you would find in Mathematica.  Unfortunately java applets are increasingly difficult to get running and too many of my students ended up with problems which looked like:
Even using a properly signed applet wasn't good enough and after several student complaints I had to remove problems with manipulable 3d graphs from my multivariable calculus class last semester.

In an effort to save those problems I've put together a javascript program based on the webgl wrapper x3dom which mostly replicates the original LiveJar applet.  The system is has only just been completed, and has some rough edges.  However it does a passable job of plotting surfaces.  Instead of the previous image students will see the following, which is much better:
They can click on the graph and drag it to rotate, or use the mouse wheel to zoom.  Since javascript is so portable, I can even include an example of a manipulable graph in this blog.  Use the controls mentioned previously or those listed here to try it out.


(Note: If you are using https you will probably need to "allow insecure content" to see the graph.) For those of you who are interested, x3dom is a webgl interpreter that uses a regular html structure to define and manipulate the graphics objects in a canvas region.  For example, to render a blue sphere you just include the following html in a <x3d> html element:
<Shape render="true">
    <Appearance>
       <Material diffuseColor="0 0 1" shininess="0.2"/>
    </Appearance>
       <Sphere solid="true" radius="1"/>
</Shape>
Then the x3dom javascript does the rest using canvas, html5 and webgl.  (For those devices not webgl compatible it has a flash based fallback.)  The javascript replacement for LiveJar basically just parses the provided mathematica code and generates the correct x3dom html using jquery.  Some things to keep in mind about this js replacement.
  • It is specifically a replacement for LiveJar and built to correctly render the ~50 problems in the OPL which use it.  New problems could certainly be made with this script, but there are other more fully featured javascript 3d graphers out there which allow you to skip the Mathematica entirely. 
  • There is a hidden configuration option in defaults.config which can be used to turn the java applet back on. 
  • These graphs will render in most phones and tablets, and can even be manipulated using a touch screen, but the performance can vary. 

Thursday, 28. July 2016

Goeff Goehle:

WeBWorK LTI - Authentication

Do you use Blackboard (or Moodle or Canvas etc...) and wish that you could have Blackboard automatically create student WeBWorK accounts, let students go from Moodle to WeBWorK without having to log in, and have students' WeBWorK grade automatically transferred back to your Canvas gradebook?   Well then the newly revamped WeBWorK LTI interface is right up your ally.  In this post I'll talk about how to set up the LTI interface to allow students to log in to WeBWorK via Blackboard (or Moodle or Canvas, etc...) as well as automatic account creation.  In the next post I'll talk about how to set up the grade passback feature.  (This is a preview of a feature that will be available in WeBWorK 2.12.) 


Learning Management Systems (LMS) like Blackboard, Moodle and Canvas all support a protocol called Learning Tools Interoperability (LTI) which can be used to connect learning tools like WeBWorK to the LMS in a standardized fashion.  Unfortunately the LTI scene is somewhat turbulent.  The most common version, 1.2, is widespread but has limited functionality.  In particular learning tools can only pass a single grade back to the LMS in version 1.2.  This is problematic for something like WeBWorK which has many grades ranging from problem grades to set grades to course grades.   Unfortunately the  more fully featured LTI version 2.0, which does allow you to transfer full gradebooks, has not seen widespread adoption and instead some LMS are implementing their own custom solutions.  For example, there is already a great deal of integration between WeBWorK and Moodle (see here for example) that doesn't make use of LTI.  Unfortunately, instructors and  departments often don't get to choose which LMS they use.  So we have upgraded WeBWorK's existing LTI module to make the most out of the more limited version 1.2 functionality.  The result is not perfect, but it does work with a wide set of LMS including Blackboard, Canvas and Moodle.  In this post I will talk about how to set up the LTI authentication interface.  I will talk about how to enable and use the grade passback feature in the next post. 

First Time Setup - WeBWorK

Before you can use WeBWorK's LTI features you need to do some initial setup.  This will need to be done by a system administrator and in particular often requires administrator access to both WeBWorK and your Learning Management System.  All of the configuration for WeBWorK is done in the authen_LTI.conf file.  First you should copy authen_LTI.conf.dist to authen_LTI.conf.  Then you need to uncomment the line
#include("conf/authen_LTI.conf");
in localOverrides.conf.  Now there are some things you will need to do in authen_LTI.conf.  The only thing you must set is the LTI Consumer Secret.  This acts like a global password and is used to authenticate all communication between WeBWorK and the LMS.  So pick something reasonably complicated.
$LTIBasicConsumerSecret = ""; #This must be set
There are some other options that can be set as well.  I'll go through them in order of most things you will most likely need to think about to less likely.

$NonceLifeTime  - When the LMS sends a user to WeBWorK it makes a request identified by a "Nonce".  This variable controls how long the Nonce is valid from the time it is created by the LMS.  It should be short enough to prevent "casual" man-in-the-middle attacks.  However, you may need to set it to something longer if your servers/network are slow or if the clocks on your servers are not synced.  

$preferred_source_of_username - When a user logs into WeBWorK from the LMS WeBWorK needs to determine the username of the person logging in.  The default is to use the email address of the student logging in as their user name.  This is because many/most LMS do not actually provide a traditional username (also called a "sourcedid").  This variable controls if the email or the sourcedid is used as the username for the student in WeBWorK.  If your LMS doesn't provide a sourcedid but you don't want to use the entire email address you can also set $strip_address_from_email and WeBWorK will strip off the server portion of the email address when creating the username. 

$debug_lti_parameters - Getting things set up for the first time can be tricky and the error messages are kept vague by default (for security).  Set this flag to have WeBWorK split out a lot more information about the LTI authentication process.  This can be a big help with troubleshooting.

$LMSManageUserData -   WeBWorK will try to keep your student's data up to date with the LMS if this flag is on.  Student data doesn't change much so you could turn it off with relatively few side effects.  You can also set custom "local functions" in authen_LTI.conf which customize users before they are created (and sets before they are assigned to users).  If you do that then you should definitely turn this variable off.

$LTIAccountCreationCutoff - For security reasons users with permission levels of ta or higher are not automatically created.  In other words you will need to manually add professor users to a course before they can log in via the LMS.  If you want to allow professors to be created automatically set this variable to 'professor'. 

%LMSrolesToWeBWorKroles - If your LMS uses roles not listed in this hash you will need to add those roles so that users get the right WeBWorK permission level. 

There are some more variables that can be set which relate to the automatic grading features, but I'll talk about those in the next post.  

First Time Setup - LMS

Next you need to set up your LMS.  In general you will need to provide the LMS  the following things: 
  1. The address of your WeBWorK server.  This has to be the address of the server as specified in site.conf, e.g. the combination of $server_root_url and $webwork_url
  2. The "Tool Provider Key" or "Consumer Key"; this is just some made up word, like "webwork".
  3. The "Tool Provider Secret" or "Consumer Secret"; this is the password used to identify the LMS to your WeBWorK site (and vice versa) and should be the same as  $LTIBasicConsumerSecret  
  4. What kind of user information is provided to WeBWorK.  
The specifics in setting up the LMS vary depending on what LMS you use.  I've posted links to setup instructions for Blackboard, Moodle and Canvas below.  Note, when the instructions refer to the "LTI" or "Tool", that is WeBWorK.
  • Blackboard:  The basic instructions are here.
    • In the Administrator Panel (under Building Blocks) click LTI Tool Providers and then Register Provider Domain
    • Input the address of the WeBWorK server in Provider Domain
    • Use Set Globally for Default configuration and input the Tool Provider Key (any word, e.g. webwork) and the Tool Provider Secret (e.g.$LTIBasicConsumerSecret)
    • Enable Send User Data. (Restricting to ssl is safer if you have https enabled.) Then enable all three user fields.  
  • Moodle:  The basic instructions are here
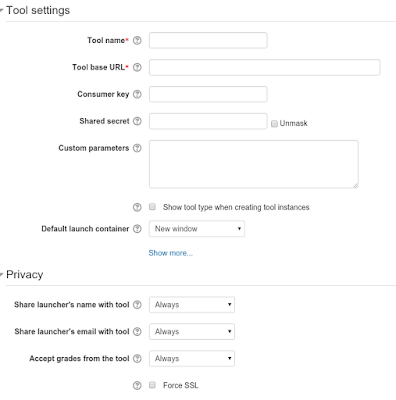
    • Go to Site administration > Plugins > Activity modules > LTI > Manage external tool types and click "Add External Tool Configuration"
    • Input the Tool Name and the WeBWorK server address as the Tool Base URL
    • Input the Consumer Key (any word e.g. webwork) and the Shared Secret (e.g. $LTIBasicConsumerSecret). 
    • In Privacy set both "Share" configurations to "Always".  If you have https available its safer to also enable "Force SSL".  
    • Canvas:  The basic instructions are here
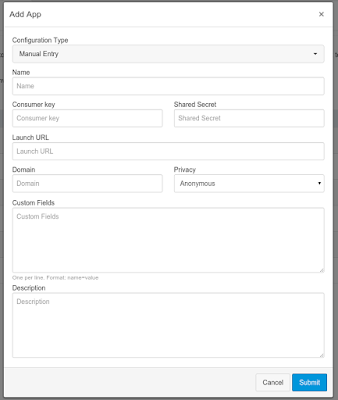
      • Go to Settings > Apps > View App Configurations > Add App
      • Choose "Manual Entry" for configuration type. 
      • The "Launch URL" is the url of the course and can be left blank.  The "Domain" is just the server address
      • Input the Consumer Key (any word e.g. webwork) and the Shared Secret (e.g. $LTIBasicConsumerSecret). 
      • You should set "Privacy" to "Public". 
    A couple of other things to think about: 
    • Its usually best to have WeBWorK open in a new window.  There are usually settings you can set which will control this.  However feel free to experiment with other settings until you find a mode you like. 
    • If you want to get fancy you can also try to have the LMS provide section or recitation information by setting a custom parameter.  In all of the configurations there is a "Custom Fields" section.  You would specify "section = #" or "recitation = #" to set the section or recitation.

    Adding Links To WeBWorK

    Once you have set up your WeBWorK configuration files and added WeBWorK as an LTI Tool to your LMS you will need to make a link/assignment in the LMS that students can use to get to WeBWorK.  Again, the process for this varies depending on what LMS you are using.  I'll describe the process for Moodle, Blackboard and Canvas.
    • Blackboard:  Some basic instructions are here
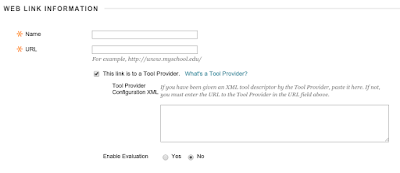
      • Go to Conent > Build Content > (Create) Web Link
      • Add a Name for your link and the URL of the course you are linking to.  You can get the url using "copy link location" on the link to the course in the main WeBWorK page.  Alternatively the url structure is:
        http://webwork.server.edu/webwork2/CourseName
      • Check "This link is a Tool Provider"
    • Moodle: Some basic instructions are here
      • Go to a Course, Turn "Editing" on, and click "Add an activity or resource".
      • Choose "External Tool" and click "Add".
      • Pick an activity name and add the URL of the course you are linking to.  You can get the url using "copy link location" on the link to the course in the main WeBWorK page.  Alternatively the url structure is:
        http://webwork.server.edu/webwork2/CourseName
    • Canvas:  Some basic instructions are here
      • Go to your Course, then Assignments, then add an assignment. 
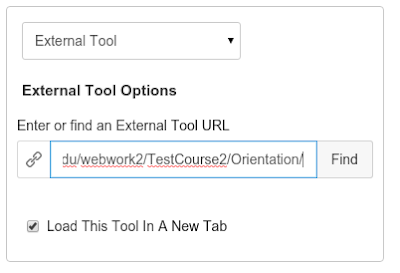
      • Select "External Tool" for Submission type. 
      • Input the URL of the course you are linking to.  You can get the url using "copy link location" on the link to the course in the main WeBWorK page.  Alternatively the url structure is:
        http://webwork.server.edu/webwork2/CourseName
    There are other places where you can add the link to WeBWorK.  Depending on your LMS you can add also add the link to the available "modules" or in the "navigation bar".  Consult the documentation for your LMS for more details.  

    Logging In and Creating Students

    Now you should be all set up.  You can test it out by creating a test student in your LMS and using the link to log into the LMS from WeBWorK.  The log into WeBWorK should not require a password, the WeBWorK user for the student should be automatically created, and the user should also automatically be assigned all "visible" homework sets.  
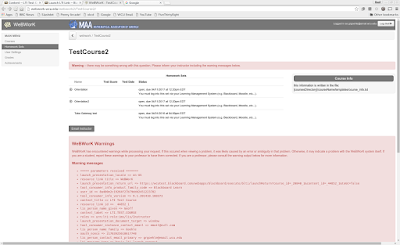
    (The warnings in the above image are the output created by the $debug_lti_parameters flag.)
    When a user logs into WeBWorK for the first time a WeBWorK user is automatically created for them.  This can save a lot of work in setting up your WeBWorK class. There are a few features/quirks of this process that should be mentioned.

    • Students created via the LMS will not have neither a student id nor an initial password.  In particular they will not be able to log into WeBWorK directly.  The $external_authentication flag is set to one by default and actually prevents them from seeing the WeBWorK login page.  They will need to log in via the LMS unless you get fancy. 
    • Accounts with a permission level of TA or higher are not automatically created by default for security reasons.  So you will have to add your TA's and other professors manually. 
    • Students created via the LMS are assigned all visible sets.  However, the due dates of these sets are not adjusted to take late registrations into account unless you get fancy. 
    • You can define the local routines which can be used to modify newly created users and newly assigned sets.  For example, you can give newly created users a random student_id/password or you can alter the due dates of a student depending on how late they register.   

    Wednesday, 18. May 2016

    Goeff Goehle:

    Release 2.12

    Hello everyone. I'm happy to announce the release of WeBWorK version 2.12. This version marks a shift to a new release schedule. Starting now we will put out new versions of WeBWorK in May and in August. In particular we won't be doing a December release since its too difficult test and release a new version in time for people to upgrade their servers over the winter break. The big feature for this release is a completely revamped LTI interface that supports grade passback. Now you can have WeBWorK grades automatically sent back to your LMS of choice (e.g. Blackboard, Moodle, Canvas). Disclaimer: Some administrative access required. Checkout the release notes and upgrade instructions after the jump or a slightly more technical version on the WeBWorK wiki at webwork.maa.org/wiki/Release_notes_for_WeBWorK_2.12 

    Major Changes

    LTI Grade Passback 


    This is a complete rewrite of the LTI authentication module including upgrades to allow grades to be passed back from WeBWorK to the LMS (e.g. Blackboard, Moodle, etc...). The authentication feature includes the ability to automatically create students logging into WeBWorK for the first time. The grading feature has two modes. You can either have WeBWorK pass back a single "homework" grade for the entire course, or you can set it up on a set by set basis. You can read more about this module at the following links. Note: The new LTIAdvanced module not a strict upgrade from the older LTI authentication module LTIBasic. The older module still works, but should be considered legacy code.

    Hardcopy Themes 


    This adds support for different hardcopy themes. Instructors will set the theme that students have access to on the Course Configuration page, and can also select the different themes on the instructor download handouts page. Right now there are two themes: the traditional two column WeBWorK theme and a new "one column" theme which the full page width. The system is also set up so that universities can add their own themes for tests or with branding. Note: You will need to make sure the fullpage latex package is available on your server to use this feature.

    Past Answer Refactor


    This is a rewrite of the existing Past Answer's page. First, it replaces the old "wildcard/regex" feature in Past Answers with multiselect lists. Now instructors will explicitly select which sets, users and problems they would like to search for past answers. It also adds the ability to download answers from the Past Answer page as a CSV. 

    OPL Statistics 


    This adds problem usage statistics to the Library Browser. When enabled and configured you should see both local and 'global' statistics on how many times problems have been assigned, students average scores and, average attempt numbers. Here local statistics are generated from the data on your WeBWorK server and reflects how your courses use problems. Global statistics are generated from over a dozen different universities and includes information on 23000 problems. You can donate data from your school by running update-OPL-statistics and then upload-OPL-statistics. 

    Translator Refactor and Advanced Problem Debugging


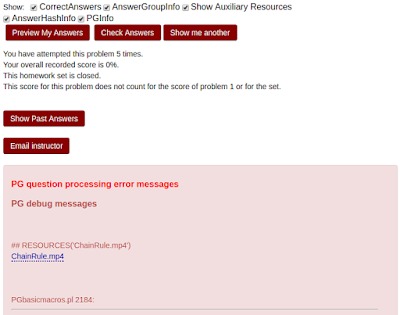
    This is an extensive under the hood revamping of how PG tracks problem resources, aliases, answer blanks and evaluators. In general the new approach uses less "dead reckoning" and is smarter about treating answer blanks and evaluators as different components of the same "object". You should not see any changes in functionality.   The one exception is that users with admin privileges will have the ability to see detailed debugging information about problems. There are four options available. AnswerGroupInfo shows information about answer "groups". This is most helpful for multianswer style problems. Show Auxiliary Resources shows information about auxiliary files used by the problem. AnswerHashInfo shows information about the answer hash, including answers, filters and evaluators. PGInfo prints the PG environment, including all available variables. 

    Periodic Randomization


    This feature allows you to force problems to generate a new seed after a fixed number of attempts. It is sort of "max attempts lite" in that students can keep trying, but they have to start over. The feature is enabled via the Course Configuration page (in the Optional Modules section). Instructors can set the default number of attempts before re-randomization. The number of attempts before re-randomization can also be set on a per problem basis.

      Minor Changes

      • Updated the orientation and demo sets to more accurately reflect how things currently work.
      • Refactored the attempts table code out into its own module. 
      • Refactored the show me another feature out into its own module.
      • Changed how options are grouped on the config page. Now there is a "Optional Modules" tab which has all of the different module options in one place. 
      • When generating individual set scores from the Scoring Tools page just-in-time sets now provide information about sub problems as well as top level problems 
      • Fixed a bug where apache child processes had the same random seed. 
      • Polished two existing features to make them more obvious. The first is the ability to display extra grade information to students on the Grades page by using email merge and the second is to restrict which students instructors can see to a particular section or group sections. 
      • Started making changes about how reduced scoring dates are reported to make it clearer that the reduced scoring date occurs before the due/close date. 
      • Fixed a bug where students may be unable to open a problem they previously attempted. 
      • Added localization files for Russian 
      • Add differentiation to parserRoot 
      • Added video macros to pg so that you can use the video command to deliver video hints via html5 
      • Fixed bugs with correct answers
      • Changed the ? popups to click instead of hover since the hover detection was spotty 
      • Added better "more like this" messages to the library browser 
      • Refactored all of the server rendering scripts to one big script sendXMLRPC.pl. In particular this enables automated sanity checking of the OPL 
      • Fixed a bug with gateways with multiple pages and checkboxes 
      • Fixed a bug where the reduced credit date wasn't set on newly created sets
      • Polished the hide scores feature on Gateways. Now if hide scores is selected scores aren't shown in grades and you cannot check answers or see correct answers. 
      • Changed the default text in the welcome message for a course and made it so that students do not see the info box if the welcome message is the default text. 
      • Fixed a bug where on very new installations the Library Browser would fail with MySQL errors 
      • Added ability to reorder problems on tables using the Problem Set Detail 2 using touch-punch 
      • Made scaffold problems more accessible by allowing the closed tab headings to be navigated to and opened using the keyboard.
      • Added a parserWordCompletion macro.  This new macro allows authors to ask free response fill in the blank questions with interactive help. As a student types their answer into the answer blank, jQuery's autocomplete feature generates a drop-down list of allowable answers that match what has already been typed. 
      • The Grades page was overhauled with an number of small modifications. The total percentage score for homeworks is now shown and the "C" has been replaced by a 100. There is also a course homework grade at the bottom of the Grades table.  (This can be turned off on the Course Configuration page if WeBWorK's grading scheme doesn't match with what you use.) 

      Upgrade Instructions

      This is the short version of the upgrade instructions.  For the longer version, with commands, visit the release notes on the wiki page at webwork.maa.org/wiki/Release_notes_for_WeBWorK_2.12 

      1. Go to /opt/webwork/webwork2, as well as /opt/webwork/pg and run git pull origin master on each directory (assuming that origin is your remote name for the openwebwork repo).
      2. Depending on your system there may be new perl modules added for 2.12. Run check_modules.pl and look for missing modules. They may include:
        • Digest::SHA
      3. You should also run pdflatex /opt/webwork/webwork2/bin/check_latex.tex and look for missing latex packages. They may include
        • fullpage (If you are missing fullpage it is in the texlive-latex-extra package in apt based distributions and texlive-preprint in yum/dnf distributions.)
      4. Check localOverrides.conf.dist and look for changes to add to the existing localOverrides.conf
        • Library Statistics - This is a new feature (see below). There are variables which control whether or not global and local problem statistics are shown in the library browser.
        • Problem Re-Randomization - The problem rerandomization feature (see below) has default options which need to be set.
      5. Check your apache configuration file and look for changes to add to your existing configuration file. In particular you may need to add the following
        • Code to set the location of the pg directory as an environment variable
        • A line to set the server admin email
      6. Check your courses.dist/modelCourse/course.conf and look for changes against your course.conf file. They may include:
        • Removing a number of outdated settings.
        • Commented out settings for controlling which instructors can see which students.
      7. Restart the webserver.
      8.  Run the upgrade admin database script. You will not be able to access your admin course until this is done, and you will need to do that to upgrade the course databases.  Next, log into the admin course and upgrade the databases for all of your courses. Your server will not be functional until you perform this step.
      9. Download the latest version of the OPL. Note: If you have library statistics enabled this will also update your statistics tables.
      10. Download the latest version of MathJax.

      Gotchas

      • I cannot access the admin course. This could be because you have not run upgrade_admin_db.pl yet.
      • I cannot generate a "one column" hardcopy. You may be missing the fullpage latex package. In apt based systems its part of the package texlive-latex-extra and in yum/dnf based systems its part of texlive-preprint
      • I see little vertical lines next to MathJax rendered formulas. This is caused by an incompatibility between older versions of MathJax and Chrome. Update MathJax with cd /opt/webwork/MathJax and git pull to fix the problem.
      • I do not see links to some of the editors in the Main Menu, including the links to Problem Set Detail 2, or I get an error about "SimplePGEditor". To fix this remove the definition of the %showeditors from localOverrides.conf. This hash should be defined in defaults.config and if you want to change things in localOverrides.conf you should set hash elements individually.
      • I can't get LTI to work. First make sure that you are using the new version of LTI. (Make a fresh copy of authen_LTI.conf from the distribution file.) Also enable the $debug_lti_parameters flag. For security reasons the default error messages from the LTI module are very vague.
      • I dont see the Library Statistics. Make sure that you have enable the appropriate flags in localOverrides.conf (see the first section of this page) and run OPL-update

      Sunday, 01. May 2016

      Goeff Goehle:

      Python in WeBWorK

      Do you dream of using WeBWorK to teach students Python? If so then you have very specific dreams. After the jump I will talk about a new set of macros recently created for use in CS courses at WCU. Rather than creating an automated program tester, of which there are many, these macros are really aimed at filling the gap between labs and projects that we have in our introductory computer science courses.

      Introduction

      In our introductory computer science courses there seems to be something of a gap between lecture and labs, where students are introduced to new features and concepts in Python, and class projects, which are larger relatively involved programs meant to test and expand students knowledge of the concepts. Outside of weekly labs there isn't any opportunity for students to practice basic syntax and concepts, however. Our goal is to create weekly homework assignments which will help students improve their fundamentals. Of course we want to bring along the instantaneous grading and feedback that are a hallmark of WeBWorK. To accomplish this we have created a collection of PG macros. The macros provide access to two main types objects, the first is the PythonOutput object. The pg file will include a short Python script that will be used to create the object. The code is then run and the standard output of the script will be the correct answer for the problem. The basic idea is that you will present the code to students and ask them what the output will be. For example:
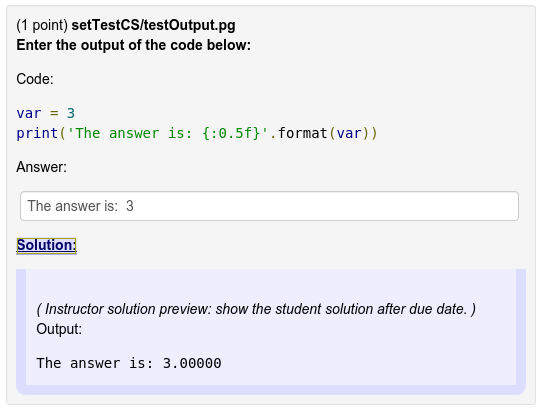
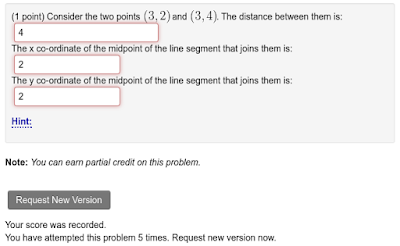
      This problem is testing if the student understands the formatting syntax for Python strings. The students answer will be compared exactly, using none of the smart comparisons you might usually expect from WeBWorK. (Of course students could just run the code and check the output, but that is not the absolute worst learning outcome.)

      The second type of object is a PythonCode. The pg file will include a short Python script that is used to create the object, just as before. However, in this case the student's will provide their own python script. The output of the student's Python script will be compared to the output of the "correct" Python script. The basic template for this kind of problem is that students will be provided with a description of what their code should do and will need to write a script to fulfil that description.
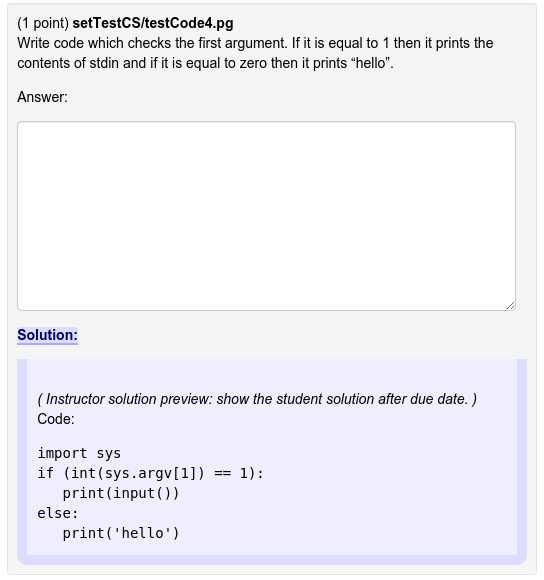
      This problem asks students to create a script which reads the first argument provided to the script, and if it is equal to 1 then print out the contents of the standard input, and print "hello" otherwise. (You can specify the arguments and contents of stdin in the pg file; more on that later.) These types of problems will probably work better if students are asked to write relatively short scripts, however there is support for running fairly complicated scripts including running multiple test cases.

      Of course, since you are running code provided by students via a web browser, security is going to be a concern. All Python code evaluated using this system is run in a code jail based on the EDX code jail. In particular the code is run as a separate user using a specially cordoned off python executable. Using AppArmor the python executable (python3 in our case) is only allowed to access the python libraries in the sand box and temporary files created by the jailing code. Because the enforcement happens at the kernel level via AppArmor, the system is reasonably secure

      Object Methods

      Lets take a closer look at the methods available to these objects and then we will do a deeper dive in actually coding problems.

      PythonCode() and PythonObject()

      For both objects these constructor methods takes the Python code as a string input and returns the object. Generally you would generally do something like:


      $python = PythonCode(<<EOP);
      for i in range(0,10):
      print("The number is {}".format(i))
      EOP

      code()

      This either sets or returns the code used to run the object.

      options()

      This method takes in various options which can be used to provide the code things like standard input, command line arguments, and even files with text. The possibilities are:

      • files=>[['file_name','content'],['file_name_2','other content']] - This is a list (reference) of (references to) pairs, each pair is a filename and a bytestring of contents to write into that file. These files will be created in a jailed tmp directory and cleaned up automatically. No subdirectories are supported in the filename. The files will be available to the jailed code in its current directory.
      • argv=>['arg1','arg2'] - This is an array ref of command-line arguments which will be provided to the code.
      • stdin=>"This string \n will be \n in stdin." - This is a string and will be provided to the code through the stdin channel.

      tests() (For PythonCode objects only)

      This is used to provide the code with a (ref) list of hash references each containing one or more entries for "argv", "files", or "stdin" with the format described above. The correct code and the student code will be run once for each set of inputs and the output of the correct code and the student code will be compared. A correct answer is when the student code output matches the correct output in all of the test cases.

      error() (For PythonObject objects only)

      This will return the error type (e.g. "TypeError" or "SyntaxError") for the Python code, if there is one. This overrides the standard output as the correct answer, if there is an error.

      evaluate()

      This runs the jailed code. It returns the status of the jailed code. The stdout and stderr of the code are stored in the stdout and stderr attributes.

      status()

      This returns the status of evaluated code.

      stdout()

      This returns the stdout output of evaluated code.

      stderr()

      This returns the stderr output of evaluated code.

      cmp()

      This returns a comparator for the object. For PythonOutput the students answer is compared to the stdout of the code. If there is a runtime error then the correct answer is the class of the error (i.e SyntaxError). For PythonCode the students answer is run as python code and the two outputs are compared for equality. If there is data for multiple collections of test input, then the outputs will be compared for all of the collections.

      Examples

      Lets take a look at a couple of examples in greater depth. The following code is for a problem which tests if students can parse the logic of an if statement.


      DOCUMENT();
      # We use PGML for these problems because it provides code and
      # preformatted environments that are useful for presenting code and
      # output. We also include the WCUCSmacros file.
      loadMacros(
      "PGstandard.pl",
      "PGML.pl",
      "WCUCSmacros.pl"
      );

      TEXT(beginproblem());

      $val = random(1,50);
      $val2 = random(1,50);

      while($val == $val2) { $val2 = random(1,255); }

      # There are an assortment of helper functions in WCUMacros
      # which can provide random text strings and variable names.

      $stringt = random_phrase();
      $stringf = random_phrase();

      while($stringt eq $stringf) {$stringf = random_phrase(); }

      # We define the actual python object, with the code here.
      # Notice the correct Python formatting and the Perl
      # interpolated values.

      $code = PythonOutput(<<EOS);
      finished = True
      score = $val
      num = $val2

      if not finished and score > 20:
      print("$stringt")
      else:
      print("$stringf")
      EOS

      # Here we actually evaluate the code. You if you skip this step
      # the stdout attribute won't be populated. It is done manually so
      # that you can set options before it is run.

      $code->evaluate();

      # Here we have the text of the problem. Notice the code wrapped in
      # ``` and the answer blank definition with the comparator.

      BEGIN_PGML
      Determine the printed output of the following section of code and
      write it in the answer box below. If the code will not run because
      of a syntax error enter "SyntaxError". If the code produces a runtime
      error enter the type of the error.

      Code:
      ```[@ $code->code @]```

      Output: [____]{$code->cmp}{50}
      END_PGML

      # Here we have the solution. The ": " makes preformatted text.
      BEGIN_PGML_SOLUTION
      The correct output is:
      : [@ $code->stdout @]
      END_PGML_SOLUTION

      ENDDOCUMENT();

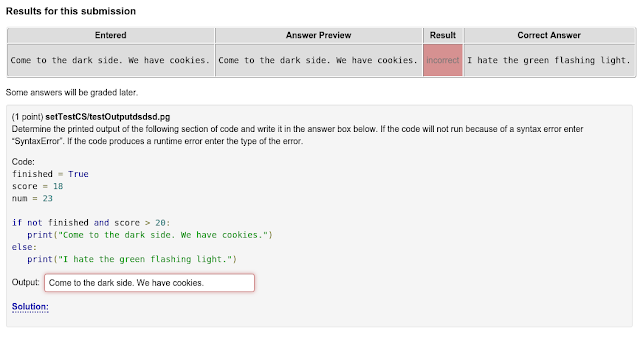
      When the code is rendered it looks like the following. Here we have provided an incorrect answer and asked the correct answer to be displayed.

      It is useful to note that the numerical value for score can end up being bigger or smaller than 20. So, assuming we had set finished = True, we could have had the result of the conditional depend on the problem seed, which is a good thing. What is more, because the answer is determined by the Python code itself, all of the quirks of the language will be faithfully recreated.

      Next lets look at a more complicated example where students are asked to write a program. In particular we are going to ask students to read in a file name from the first argument, open the file and print its contents to stdout. The pg code looks like this:


      DOCUMENT();
      loadMacros(
      "PGstandard.pl",
      "PGML.pl",
      "WCUCSmacros.pl",
      );
      TEXT(beginproblem());

      # Here is our "correct" Python code. (We do not actually have to
      # evaluate the code because we are using test cases.)
      $code = PythonCode(<<EOS);
      import sys
      if (len(sys.argv) != 2):
      print('No filename provided.')
      exit()
      filename = sys.argv[1]
      fh = open(filename);
      print(fh.read())
      EOS

      # We can use the random_word macro to come up with random words
      # for variable and file names.
      $filename = random_word().'.txt';

      # This is where we populate the input data for our tests. We have
      # two tests. One has an argument with the file name, an a file
      # with that name and a random phrase.
      $code->tests({argv => [$filename], files=>[[$filename,random_phrase()]]},
      # The second test has a file, but no argument. In this case the script will
      # exit silently.
      {files=>[[random_word().'.txt','This should not be read.']]});

      # Here is the PGML for the problem text. Notice the markdown style text
      # text formatting.
      BEGIN_PGML
      Write a Python script which will do the following:
      * It should accept the name of a file as a command line argument.
      * If there is not exactly one command line argument it should print the string
      _No flename provided._ and exit.
      * If there is a command line argument it should open that file and print the contents.

      Code:
      [_______]*{$code->cmp}
      END_PGML

      # We can also provide our code as a solution.
      BEGIN_PGML_SOLUTION
      Solution Code:
      ```[@ $code->code @]```
      END_PGML_SOLUTION
      ENDDOCUMENT();

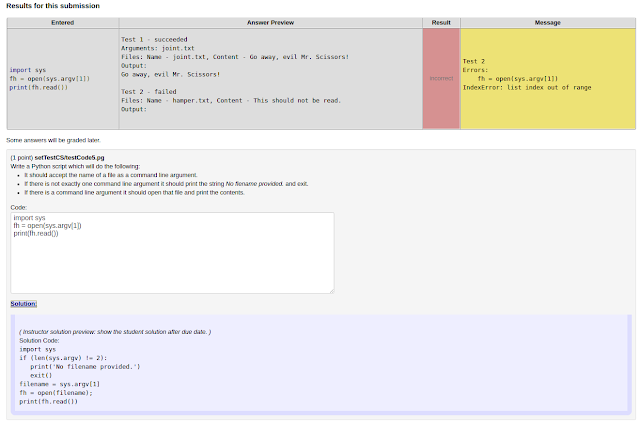
      Now lets take a look at what this looks like when run. In the following we have an example of a student submitting a script that opens the file and prints it, but does not check the number of arguments first.

      Notice that students are shown the results of each of their tests, as well as any errors that were reported during any tests. The "show correct answer" output shows the correct output, and the correct code is contained in the popover for the correct answer. In addition the system will use pylint to comment on their syntax and formatting. When it finds errors it will post them in a comment box like the one below.

      These features represent the basic foundation of our python macros. As we actually write problems and use them in class I'm sure we will come up with new features and best practices. Check back in a couple of semesters to see how things have progressed.

      Sunday, 06. March 2016

      Goeff Goehle:

      OPL Statistics

      A feature recently added to the development branch of WeBWorK (to be released in 2.12) is the option to display problem statistics in the Library Browser.  You can display local statistics, which are local to your university, or "global" statistics which were generated using data contributed by a number of different institutions.  Find out more below, including how you can contribute your data to the global repository.

      If you use the Library Browser in the development version of WeBWorK you may notice that the problems have some extra data in the "header" portion.
      The three quantities displayed are:

      • Usage - The total number of students who have had the problem assigned to them. 
      • Attempts - The average number of attempts students have made on this problem. 
      • Status - The average status that students ended up with. 
      In general problems with high usage numbers don't have bugs because they have been so thoughoutly tested.  Problems with a large number of attempts are harder for students to do, and if the average status is well below 85% or 90% then it means a significant number of students are never able to do the problem correctly.  (Especially considering most people allow students an unlimited number of attempts.) All three of these quantities are useful when you are deciding to add a problem to your homework set.  Do you intend for all students to be able to do the problem?  How much effort will they need to put in to it? Etc...

      The difference between GLOBAL and LOCAL statistics is that Local statistics are generated only from the student data on your WeBWorK server, while Global statistics are generated from a central database of contributed data.  Currently the Global statistics database has data on 23000 problems with an average of 367 assigned students per problem. The data was donated by over 15 different institutions.

      How can you use this feature yourself?  It is pretty straightforward.  First you need to set the following variables in your localOverrides.conf file.
      # This flag controls if local statistics are shown in the library
      $problemLibrary{showLibraryLocalStats} = 1;
      # This flag controls whether global statistics will be displayed
      $problemLibrary{showLibraryGlobalStats} = 1;
      You also need to generate the statistics (or import it in the case of the global statistics table).  To do this just run 
      webwork2/bin/update-OPL-statistics
       It is recommended that you run this once at the beginning of each semester to keep your local data tables up to date.  And that's it!  You need to make sure the feature is enabled and that you run the data generating script on a regular basis.  If you want to go a step further you can donate your local data to the central database.  Only aggregate data (e.g. total number of times a problem was assigned, average status on a problem, average number of attempts) is transmitted.  In particular no student data ever leaves your server.  If you decide you want to donate your data just run
      webwork2/bin/upload-OPL-statistics
      The script will ask you some questions, generate a .tar.gz. file, and upload it to the central server.  It leaves behind a copy of the .tar.gz file in case you want to see what exactly is transmitted.

      WeBWorK LTI - Grading

      Do you use Blackboard (or Moodle or Canvas etc...) and wish that you could have Blackboard automatically create student WeBWorK accounts, let students go from Moodle to WeBWorK without having to log in, and have students' WeBWorK grade automatically transferred back to your Canvas gradebook?   Well then the newly revamped WeBWorK LTI interface is right up your ally.  In the last post I talked about how to set up the LTI interface to allow students to log in to WeBWorK via Blackboard (or Moodle or Canvas, etc...) as well as automatic account creation.  In this post I'll talk about how to set up the grade passback feature. (This is a preview of a feature that will be available in WeBWorK 2.12.) 

      With the newly revamped LTI interface it is possible for WeBWorK to automatically pass grades back to your Learning Management System (LMS), e.g. Blackboard, Moodle, Canvas, etc...  However because we are using the more widespread, but also more restrictive, version 1.2 of LTI there are some quirks.  The way LTI grade passback works is when you create the "Assignment" in your LMS that points to WeBWorK that "Assignment" gets a corresponding column  in your LMS gradebook.  WeBWorK then returns a percentage grade which is used to assign the student grade in the LMS.  In particular there is exactly one column in the LMS grade book for each link to WeBWorK in the LMS.  Given this restriction there are two modes for the WeBWorK LTI grading interface.

      • Course Grade Mode: In this mode you create a single link/assignment in the LMS which points to WeBWorK.  WeBWorK will then return the "cumulative" homework grade as a percentage to the LMS.  In other words the grade in the LMS column is the course homework grade. 
      • Homework Grade Mode:  In this mode you create a single link/assignment in the LMS for each problem set in WeBWorK.  WeBWorK will then return the total score for the problem set to the LMS.  In other words you will have multiple columns in the LMS gradebook, one for each link, and they will be filled out with the student scores on individual WeBWorK problem sets.  
      The first mode is the easiest to set up, but the second mode is more granular and ends up transferring more data to the LMS gradebook.

      First Time Setup

      There are several configuration variables in authen_LTI.conf which need to be set to enable grade passback.  

      $LTIGradeMode -  If this variable is not set then the grade passback feature is turned off.  If it is set to "course" then the Course Grade Mode described above is used.  If it is set to "homework" then the Homework Grade Mode described above is used. 
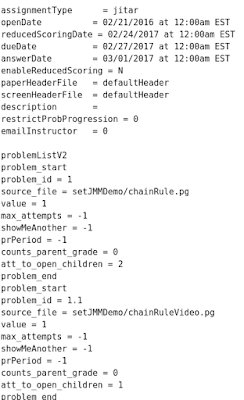
      $LTIGradeOnSubmit - If this flag is enabled then WeBWorK will attempt to update student grades every time they submit an answer to a problem.  This keeps the student grades current, but can be a drain on your server.  If either the WeBWorK server or the LMS server bogs down it might be a good idea to turn this off. 

      $LTIMassUpdateInterval - Because instructor activities like adding new sets, deleting problems, or marking problems correct can change student grades we periodically update all student grades just to make sure things are current.  This interval controls how often that mass update happens.  It is set for once every 24 hours by default.  

      In addition to configuring WeBWorK you may also need to enable the grading feature on your LMS.  How this works varies among different LMS.  I will describe how to configure Blackboard, Moodle, and Canvas. 
      • Blackboard - There is a global flag which controls if Tools are allowed to submit grades.  You will need administrator access to change this.
        • In the Administrator Panel go to Building Blocks > LTI Tool Providers > Global Properties
        • Enable the setting to allow any Tool Provider to post grades to the Grade Center.
      • Moodle - There is a flag which controls if Tools are allowed to submit grades.   This can be set for individual courses or site wide. 
        • Go to Site administration > Plugins > Activity modules > LTI > Manage external tool types.
        • Edit the WeBWorK tool and under Privacy enable "Accept grades from the tool".
      • Canvas - Grade passback is always enabled in Canvas and requires no global configuration. 

      Adding Graded Links

      You add links to WeBWorK the same way you do if you are just using the authentication feature.  In particular you create an "Assignment/Link" and provide the url of the WeBWorK course.  The only additional thing you have to worry about is setting up the grade.  In general you need to make sure grading is enabled for the link and set the total number of points the assignment is work.  It is recommended that you use 100 points so that the grade looks like a percentage.  However, the grade given to the student will always be a percentage of the total available points so  you can use however many points you want.  I'll describe the specifics for Blackboard, Moodle and Canvas.  
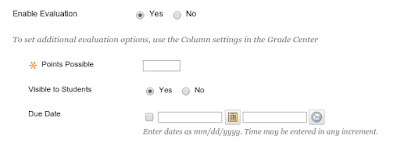
      • Blackboard: You need to make sure "Enable Evaluation" is set to yes.  You can also set the number of points available and the due date of the assignment. 
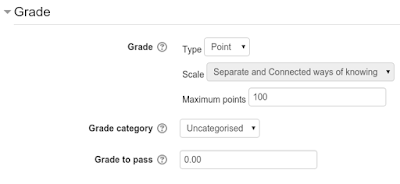
      • Moodle: All you need to do is set the points possible as well as any of the other Moodle specific options. 

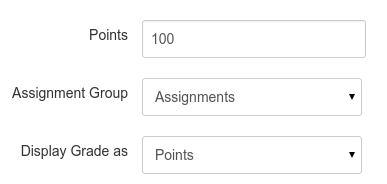
      • Canvas:  All you need to do is set the number of points possible. 
      Its important to remember that the only information transferred from WeBWorK to the LMS is the percentage grade of the assignment.  In particular things like visibility and due dates are not automatically synchronized.  It is recommended that you do not set due dates in the LMS and allow WeBWorK to control the availability of the problem sets.  

      Course Grade Mode

      Lets look at an example of Blackboard set up with Course Grade mode.  Here we have a single link to our WeBWorK course in the Content area.  Students will use this link to access WeBWorK. 

      Once in WeBWorK they navigate and finish problem sets in exactly the same way they normally would.  WeBWorK behaves just as it would if there were no LMS at all.  The only difference is when students submit a grade they should get a message like the one below.  
      Note:  In many LMS instructors do not have grades.  In this case you will see the message "Your score was not successfully sent to the LMS".  This is fine, unless its not.  If you suspect that there is a problem enable $debug_lti_parameters to see more verbose error messages.  The goal is to see the following in WeBWorK (if you don't have Homework Totals in your version of WeBWorK don't worry, its not out until 2.12)
      and the following in Blackboard

      And that is pretty much it.  The Course Grade Mode is not particularly complex.  Some things to remember: 
      • How the WeBWorK grade is used in the "Total Grade" on the LMS is entirely up to you and how you have set the weights in the LMS.  See the documentation for the LMS for how to set weights on grades.  
      • Only make one (graded) link to WeBWorK.  If you make more than one then your gradebook will have multiple columns and WeBWorK will get confused about which one to send the grade back to.  
      • Users have to log in to WeBWorK via the LMS at least once for this to work.  The easiest way to guarantee this is to make the LMS create the users.  However, once they have logged in via the LMS once they can log in directly via WeBWorK after that (assuming your authentication system is set up that way).  

      Homework Grade Mode

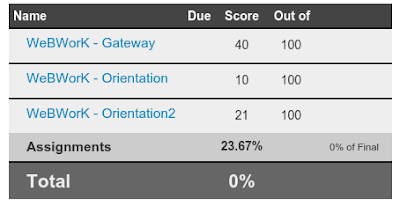
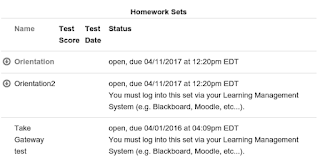
      This grading mode is more granular in that students get all of their homework grades, as well as any other LMS grades, all in one place.  The cost is that you need to set up a separate link to each WeBWorK problem set.  For example in this Canvas course we have links to three different WeBWorK assignments
      The links are set up exactly the same as described in the previous post with the exception that they should point to the homework set that they correspond to.  For example a link to the Orientation set would have the url 
      (i.e https://webwork.server.edu/webwork2/TestCourse/Orientation)
       In general the link to set <set name> should have the following format:

      • Default or Just-In-Time Set: http://<server address>/webwork2/<course name>/<set name>
      • Gateway: http://<server address>/webwork2/<course name>/quiz_mode/<set name>
      • Proctored Gateway: http://<server address>/webwork2/<course name>/proctored_quiz_mode/<set name>
      If the set name is not somewhere in the url for that set on the LMS side then it is incorrect.  Once things are set up students then click on the links to access their homework and complete their assignments as normal.  If things are working then they should see their grades appear in the LMS.
      There are a couple of caveats.

      • Students have to click on the link corresponding to the set at least once for grading to work.  Once in WeBWorK they can navigate like normal.  However, if they try to navigate to sets which are open, but which they haven't visited via the LMS get get messages like

      • Homework due dates and problem totals are not synced between WeBWorK and the LMS.  The easiest thing to do is to set all of the homework sets to be open forever in the LMS and let WeBWorK manage access to the homework sets.  You can also set the number of points for each set to 100 in the LMS and the score will be a percentage.  You can also keep the due dates and number of points synchronized, but you will have to do so by hand.  
      • Also note that depending on how you weight things in the LMS the contributions of the homework to the total grade in the LMS will be different than the Homework Total in WeBWorK.  (In particular the WeBWorK grade is the total number of points earned over the points available, while, assuming you set the points to 100 for every assignment in the LMS, the LMS grade is the average of all the homework percentages.)  You can turn off displaying the Homework Total in WeBWorK using the Course Configuration menu if this bothers you or your students.  
      In general using Homework Grade mode is more work, but if you make heavy use of an LMS it is probably worth it.  You can use different grade modes in different courses by setting the $LTIGradeMode variable in the course.conf file.   So you are not locked into using one type of grading for all of your courses.  

      Hardcopy Themes

      Are you tired of the standard "two column" hardcopy format that has been used by WeBWorK since the project was started?  Well starting in version 2.12 there is the option to choose a "hardcopy theme".  Currently there is are two themes, a one column mode and a two column mode.  However, the system is build so that you could add your very own.

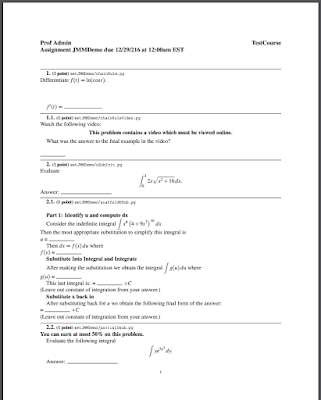
      Choosing a hardcopy theme is simplicity itself.  When generating a hardcopy simply choose "One Column" or "Two Columns" for the Hardcopy Theme option.

      You will get either this:

      or this: 

      You can also set the default theme on the Course Configuration page.  In particular the theme chosen on the Course Configuration page is the only theme that students are allowed to use.

      Unless you are willing to get your hands dirty, then that is the extent of the feature.  However, there is also the possibility of adding new Hardcopy themes to the mix.  To create a new theme you need to add a folder to the webwork2/conf/snippets/hardcopyThemes folder.  This new folder should contain the following files:

      • hardcopyPreamble.tex - This tex file contains the LaTeX code that will be at the beginning of the hardcopy.  This is where all of the preamble code goes, including packages, macros, page formatting, etc...
      • hardcopyPostamble.tex -  This tex file contains the LaTeX code that will be at the end of the hardcopy.  It ends the document.  
      • hardcopyProblemDivider.tex - This tex file contains the LaTeX code that will be inserted between each problem.  
      • hardcopySetDivider.tex - This tex file contains the LaTeX code that will be inserted between each set. 
      • hardcopyUserDivider.tex - This tex file contains the LaTeX code that will be inserted between each user.  
      • hardcopySetHeader.pg - Normally this pg file would be rendered and placed at the top of each set.  However, most sets now have their own Hardcopy Header file specified on the Set Detail page which takes precedence over this one.  
      • hardcopySetFooter.pg -  This pg file is rendered and the resulting tex code is put at the bottom of each set.  
      The changes you make to these files, in particular the hardcopyPreamble.tex file, will control what the resulting hardcopy looks like.  You could put more space between problems by adding a vspace to the problem divider.  You can add university specific detailing to the footers.  You could change the font or margins.  Once you have gotten the hardcopy format you desire its time to add it to WeBWorK.  In order to do that you should add overiddes to the following variables in localOverrides.conf.
      # Available Hardcopy themes (located in snippets)
      $hardcopyThemes = [qw(oneColumn twoColumn)];
      # Hardcopy theme names (pretty names for themes)
      $hardcopyThemeNames = {oneColumn => 'One Column',
            twoColumn => 'Two Columns'};
      # Default Hardcopy them
      $hardcopyTheme = "twoColumn";
      The theme name (e.g. oneColumn, twoColumn) should be the name of the folder you made in hardcopyThemes.   The pretty theme name (e.g. One Column, Two Columns) is the name that is actually displayed to users.  Once you add your theme to $hardcopyThemes and $hardcopyThemeNames you are done.  The theme will automatically appear on the Hardcopy page and the Course Configuration page as an option.  If you make a particularly good theme, please consider contributing it to the main repository so other people can use it.

      Grades, External Grades, and Email

      The grades page in WeBWorK has seen some changes for the next version (2.12).  In particular homework percentages are now displayed for each homework and a "Homework Totals" score is displayed as well.  This post also presents an existing feature which most people may not know about; how to display external grades in WeBWorK.

      Grade Page

      There have been a number of tweaks made to the grades page, as you can see below. 
      The two main changes are the addition of a percent score for individual homework sets and a Homework Totals score for all sets.  The Homework Totals score is the total number of points earned out of the total available points.  In particular, it matches the score you would get using the Scoring Tools page if you selected all homework sets.  If you want to change the weight of a homework set simply change the value of all of the problems in the set.  (For example if you set the value of all the problems in the set to zero then the sets grade doesn't count toward the Homework Total.)  If you do something entirely different with your homework scores and don't want students to get the wrong impression from the Homework Total, you can turn the feature off in the Course Configuration page.  
      Another feature, which isn't new but most people don't know about, is the ability to display external grades in WeBWorK.  The pertinent message on the grades page is
      There is no additional grade information. A message about additional grades can go in in [TMPL]/email/report_grades.msg. It is merged with the file [Scoring]/report_grades_data.csv. These files can be edited using the "Email" link and the "File Manager" link in the left margin.
      In particular lets use the Email link to create the following message and save it as report_grades.msg 

      Hello $FN

      Your grade for midterm 2 is $COL[7]

      Your 6th week grade is $COL[-1]
      Recall that when you are emailing students you can choose a Merge File to include data from a csv in your email.  The exact same macros are used in the report_grades.msg.  The list of available macros is: 
      • $FN - first name
      • $LN - last name
      • $SID - student ID number
      • $SECTION - student's section
      • $RECITATION - student's recitation
      • $STATUS - C, drop, withdrawl, audit, etc.
      • $EMAIL - student's email address
      • $LOGIN - student's login name
      • $COL[3] - third column in merge file
      • $COL[-1] - last column in merge file
      As an aside, emailing students their WeBWorK grades periodically is a great way to make sure that they are paying attention to doing their homework.  

      The merge file we use for displaying external grades, report_grades_data.csv,  is a csv with the same format that is produced by the Scoring Tools page.  In particular all of the csv's from the scoring tools page go in the "scoring" folder, which is located one directory up fro the "templates" folder.  The easiest way to add external grades is to download one of these scoring csv files, and edit it.  Delete all but the first six columns and then add new grade columns as you see fit.  Finally re-upload it to the scoring folder with the name "report_grades_data.csv".  The import part is that the first six columns are, in order,
      1. STUDENT ID
      2. LOGIN ID
      3. LAST NAME
      4. FIRST NAME
      5. SECTION
      6. RECITATION
      You can put whatever data you want in the remaining columns. For example we might have a report_grades_data.csv file in the "scoring" directory with the following data.
      STUDENT ID LOGIN ID LAST NAME FIRST NAME SECTION RECITATION Midterm Final
      admin admin Admin Prof 9 10 67 89
      teststud teststud Funky Spoon 3 5 78 56
      practice1 practice1 PRACTICE1 JANE 2 4 56 48
      practice3 practice3 PRACTICE3 JANE 2 4 48 43
      practice4 practice4 PRACTICE4 JANE 2 4 78 16
      practice5 practice5 PRACTICE5 JANE 2 4 99 56
      practice6 practice6 PRACTICE6 JANE 2 4 26 78
      practice7 practice7 PRACTICE7 JANE 2 4 89 98
      practice8 practice8 PRACTICE8 JANE 2 4 92 82
      practice9 practice9 PRACTICE9 JANE 2 4 56 81

      With the report_grades.msg above and this report_grades_data.csv file if we visit the Grades page we see the following at the bottom:
      As a bonus, we can also send this message to all of the students using the Email page with no additional work. There is not currently a way to integrate external grades into WeBWorK so that they are included in course calculations, but this, at least, allows you to keep students up to date.


      Thursday, 25. February 2016

      Goeff Goehle:

      Release 2.11

      I wrote this when version 2.11 was released (almost two months ago at this point) but never got around to actually proofing and posting it.  So here is the late version...

      WeBWorK version 2.11 has been released.  The big addition for this release is a the new adaptive homework type, just-in-time.  I wrote about just-in-time a while ago on this blog and it has finally made its way into the master version of WeBWorK.  There are also some other big new features which I've described below. (The official release notes can be found at http://webwork.maa.org/wiki/Release_notes_for_WeBWorK_2.11)


      Major Additions

      Just-In-Time Assignments


      This is a new adaptive homework assignment type. The basic idea is that instead of having a linear list of problems, the problem set has a "tree" of problems. Each problem has a number of "child" problems which are only shown to the student if they have trouble with the parent problem. The basic idea is that these child problems will have review content to help the student solve the original problem. There are a number of other features including restricting the progress of students through the homework and emailing the professor if the student fails to complete the assignment.

      Editing Course.conf


      The ability to edit course.conf from the web has long been a security and stability issue. (One missing semicolon can lock a professor out of their course and require command line access by a super user to recover.) Because of this users with "professor" privilege will not be able to edit either course.conf or simple.conf from the File Manager. Instead only users with "admin" privilege will be able to edit those files. This is likely to feel restrictive to users who are used to making lots of modifications via course.conf. There are really three main ways to deal with this:

      • Common configuration changes can easily be added to the Course Configuration page. If you have a configuration page that you make a lot submit it as a github issue.
      • Administrators in the admin course are always given admin privileges if they are added to a course. Any admin user can grant any other user admin privileges using the Classlist Editor. You can use this to give trusted professors permission to edit course.conf. Courses that don't have any "admin" privileged users can have one added using wwsh.
      • You can disable this feature by editing the $uneditableCourseFiles variable. Do this at your own risk.

      Def File Changes 


      Because of all the new features added to WeBWorK the way problems are defined in def files needed to be refactored. Now problems in def files are defined using the same "property = value" format as the rest of the problem set. You can read more about the new def format at http://webwork.maa.org/wiki/Set_Definition_Files (specifically the Problem List Version 2 portion). Older def files using the "version 1" problem list can still be imported, but all exports will use version 2.

      XMLRPC Rendering 


      Driven by the Mathbook XML project http://mathbook.pugetsound.edu/ and the Moodle opaqueserver linkage the ability to render problems via the XMLRPC pathway has been greatly improved. In particular problems can be embedded in pages using iframes. The embedded problems can be interacted with, answers can be checked, and there is even the option to store answers and scores locally in the browser.

      Live Graph 3D 


      The java based Live Graph 3D grapher has been replaced by a drop in javascript alternative. This javascript alternative is webGL based and should work on any device which has webGL support. It should work as a replacement without any additional configuration.  This grapher has been tested with the existing problems in the OPL which used the old java grapher. If there are issues with local problems please report them.

      Minor Additions

      • wwsh: Due to recent changes in Perl wwsh no longer gives you an interactive perl interface. Instead you call wwsh with a script as follows wwsh <course name> <script name>. Several scripts have been provided to help recover courses. 
      • Set Defs Search: You can now set configuration variables which allow the Homework Sets Editor page to search for set def files in folders other than templates. In particular it can look for def files in subdirectories of templates and optionally in the OPL. 
      • No More Timezones: Timezones in date entry have been removed, as have most time zones in displayed dates. (Due dates displayed to students still have time zones.) Now all times are interpreted to be in the time zone defined in the Course Configuration page. This should eliminate the longstanding problem of entering a date with the wrong daylight savings timezone and having your time unexpectedly shifted by an hour.
      • Library Browser Icons: There are now icons in the library browser to help signify when problems use math objects and when problems don’t have any randomization. 
      • Course Renaming: In addition to renaming courses you can now give courses new Course Titles and new Institutions. This is done using the Rename function on the course admin page.
      • Numerous Bug Fixes:  Many bug fixes, most of which can be found listed in the release notes. 

      Upgrade Instructions

      1)  Go to /opt/webwork/webwork2, /opt/webwork/pg and run
      git pull origin master
      on each directory (assuming that origin is your remote name for the openwebwork repo).

      2) Depending on your system there may be new perl modules added for 2.11. Run check_modules.pl and look for missing modules. They may include:
      LWP::Protocol::https (version > 6.06)
      Class::Accessor
      An outdated LWP::Protocol::https module can keep the Library Browser from running correctly if you are using https.

      3) Check localOverrides.conf.dist and look for changes to add to the existing localOverrides.conf. There are a couple of important things here that will negatively affect your system if you don't deal with them.

      The show editors hash should be removed. If it is not removed then there will be minor annoyances (e.g. the link to the problem set detail page that appears when you are looking at a homework set will not appear). Instead of redefining this hash, overrides should be made to the hash elements individually. For example
      # These will enable the versions of the problem set detail page and library browser page that do not use the xmlrpc pathway
      #$showeditors{problemsetdetail1} = 1;
      #$showeditors{librarybrowsernojs} = 1;

      # This will enable the slightly fancier PG problem editor 3
      #$showeditors{pgproblemeditor3} = 1;

      # This will turn off ww3 (if you are on the ww3 branch)
      #$showeditors{ww3} = 0;

      While this does not appear by default in localOverrides.conf.dist, something you may want to modify using localOverrides.conf is the variable controlling which files users with professor privilege can access. For security reasons default only users with admin privilege will be able to access course.conf using the File Manager. The variable you would change is
      # For safety reasons these course specific files cannot be edited from the File Manager except by an administrator.  These are paths relative to the course directory.
      $uneditableCourseFiles = ['simple.conf',
       'course.conf',
          ];

      Options which control if the homework sets editor will look for set .def files in places other than templates. In can search in subfolders of templates or even the OPL. The options are 
      # Searching for set.def files to import 
      # Uncomment below so that when the homework sets editor searches for set def
      # files, it searches beyond templates; it can search deeper subfolders of 
      # templates, and optionally also descend into Library
      #$options{setDefSearchDepth}=4; #search down 4 levels
      #$options{useOPLdefFiles}=1;

      4) Check site-conf.dist and look for changes to add to the existing site.conf. Things to look for include:

      The version of your server is determined automatically from your server banner. However, if you have turned off the version in your server banner you can specify it manually with
      $server_apache_version = ''; # e.g. '2.22.1'  

      Specifying if tls is allowed when sending email. This is enabled via
      $tls_allowed = 1;  

      Specifying an email address to display when apache has problems with webwork pages, assuming you don't want to use the default apache admin email. This is done via
      $webwork_server_admin_email ='';

      Specifying a default timeout for the checkurl command. This is done via
      $externalPrograms{checkurl}     = "/usr/bin/lwp-request -d -t 40 -mHEAD "; 

      5) Check your apache configuration dist file and look for changes to add to the existing apache configuration file. Things to look for include

      A line which ensures that each apache child process has a different random number seed. The main impact this has is that without the following line practice users are not shuffled randomly.
      PerlChildInitHandler "sub { srand }"

      The code which overrides the administrator email using the variable mentioned in the previous section. The code looks like

      my $webwork_server_admin_email = $ce->{webwork_server_admin_email};
      if ($webwork_server_admin_email) {
      $webwork_server_admin_email = $ce->{webwork_server_admin_email};
      warn "set email from site.conf";
      } else {
      $webwork_server_admin_email= $ENV{SERVER_ADMIN};
      }

      Optional code to make use of the opaque server interface with Moodle.

      Optional code to improve performance by using mod_expires.

      6) Restart the webserver. (with apachectl graceful or similar command.)

      7) Log into the admin course and upgrade the databases for all of your courses. Your server will not be functional until you perform this step.

      8) Download the latest version of the OPL using
      cd /opt/webwork/libraries/webwork-open-problem-library
      git pull origin
      OPL-update

      Gotchas

      • You can get a warning when trying to log into the admin course: You will need to run upgrade_admin_db.pl. You will also need to upgrade all of your other course databases using the admin course.
      • You can't edit the course.conf file: You need "admin" permissions. See item 2 of Primary Changes.
      • You can't find the "SetName" link in the sidebar that normally brings you to the Problem Set Detail page for a particular set: You need to remove the %showEditors hash from your local overrides file. See item 4 of Upgrade Instructions.
      • The library browser may stop responding: When you select a subject the chapter list may not populate and you may get error popups. The main cause of this is a missing or outdated LWP::Protocol::https (version < 6.06) package.
      • Remember to update the OPL and run OPL-update.

      Friday, 09. October 2015

      Michael Gage:

      Using WeBWorK questions in Moodle quizzes -- the Moodle/WeBWorK question bridge

      This is a copy of a post that I made to the Moodle forum on Quizzes.

      I’m happy to announce a version of WeBWorK that can serve mathematics questions via a Moodle quiz.  This gives a tighter connection between Moodle and WeBWorK, allowing students to work exclusively with the Moodle quiz interface while WeBWorK produces the mathematics questions and processes the student answers in the background.  The result is similar to using STACK to produce and process mathematics questions.

      This is a first attempt at realizing the question level WeBWorK-Moodle bridge which I proposed in this forum in my earlier post last January ( https://moodle.org/mod/forum/discuss.php?d=277922) and on my blog (http://michaelgage.blogspot.com/2015/01/connecting-webwork-to-moodle-2xs.html )

      It makes most of the 25K+ mathematics questions written for WeBWorK’s OpenProblemLibrary (http://webwork.maa.org/wiki/Open_Problem_Library) available for use in Moodle quizzes as well.  The OPL began with questions designed for single and multivariable calculus courses (and that is still the majority of the collection) but has expanded in both up and down to include questions for linear algebra and differential equations, complex variables, operations research, and statistics; as well as precalculus and developmental mathematics problems and many other math subjects.

      To see this Moodle/WeBWorK connection in action,  view the Moodle course for linear algebra and differential equations at (https://devel3.webwork.rochester.edu/moodle/course/view.php?id=21).  You will need to login as “visitor”, using the password “visitor” in order to view the quizzes. (Guests are not allowed to view Moodle quizzes.)

      This is  a mockup of the matrix algebra/ODE course which I taught in 2009 using the Moodle/WeBWorK assignment connection (which presents an entire homework assignment using the WeBWorK interface).  In each week  you’ll see the original WeBWorK assignment that I used (the icon is a yellow spider web on blue background) and near it the Moodle Quiz version of the same assignment.  Try each of them to get a comparison between the WeBWorK/Moodle assignment bridge and the new WeBWorK/Moodle question bridge.

      I have set the behavior of the Moodle Quiz so that it closely approximates the original WeBWorK assignment.  These assignments are meant primarily for homework/practice not for normative assessment.  The student can retry each question as often as she wishes and if there are several answer blanks then evaluation is given separately for each blank.

      The Moodle portion of this bridge is built on the Opaque question type module implemented by Tim Hunt for interfacing with webservice test engines.  I am indebted to Tim for help and advice while I was implementing this Moodle/WeBWorK question interface.

      Information for installing and configuring the Moodle Opaque question type is available on github at https://github.com/moodleou.  Specifically you need the opaque qtype module:  https://github.com/moodleou/moodle-qtype_opaque and the opaque behaviour module:  https://github.com/moodleou/moodle-qbehaviour_opaque.

      I’ll provide more detailed suggestions for creating your own Moodle/WeBWorK questions later but for those somewhat familiar with both WeBWorK and Moodle here is the short explanation.
      1. You create a new Opaque engine pointing to the url: https://devel3.webwork.rochester.edu/opaqueserver_wsdl and set the question bank URL for the engine to https://devel3.webwork.rochester.edu/webwork2/spring09mth165 .
      2. For each question the questionID should be the same as the path of a WeBWorK problem in the OpenProblemLibrary with the following replacements.
      The initial segment should be “library” instead of “Library”, each slash is replaced by two underscores, and each hyphen is replaced by three underscores. (This is required in order to conform to the Opaque client naming scheme.)
      For example:
      Library/Rochester/setAlgebra01RealNumbers/lhp1_31-34_mo.pg
      is obtained using the questionID:
      library__Rochester__setAlgebra01RealNumbers__lhp1_31___34_mo.pg

      For those who are really impatient the WeBWorK server function is provided by adding the project opaque_server along side a standard WeBWorK course. The Opaque Server can be found at (https://github.com/openwebwork/opaque_server) along with minimal documentation for installing.  

      This is the first version of the Moodle/WeBWorK question bridge so the behavior may change slightly in the future.  Because STACK and WeBWorK are already very similar I would be interested in creating a question type that was interchangeable between the two background mathematics engines.  Instructors would be able to mix STACK and WeBWorK questions in the same quiz in such a way that it was invisible (or nearly invisible) to students which engine was handling the question.

      Your comments are welcome.

      -- Mike Gage, University of Rochester, Rochester, NY